How to Connect ChatGPT to Your Mac
Give ChatGPT direct access to your Mac apps — Mail, Calendar, Contacts, Teams, OneDrive, and 150+ tools. Works from chatgpt.com web, mobile, or any device. Privacy-first: opt-in via Cloud Relay, encrypted end-to-end.
What This Lets You Do
ChatGPT runs in the cloud, but your email, calendar, and Teams chats live on your Mac. With LMCP plus the Cloud Relay, ChatGPT can call tools that run directly on your Mac. Ask it from any device:
- “Summarize my unread emails from this week”
- “What’s on my calendar tomorrow?”
- “Find the Teams message where Marco mentioned the API migration”
- “Draft a reply to Sarah’s email about the budget”
ChatGPT sends the request to the LMCP backend, the backend forwards it through an encrypted WebSocket tunnel to your Mac, your Mac runs the tool, and the result comes back to ChatGPT — usually in under 2 seconds.
Privacy Story
Cloud Data Forwarding is off by default and opt-in per machine. When off, the connector's tools/list advertises only setup_install — data tools are not listed until you enable forwarding.
When you turn it on, your data still comes from your Mac — nothing is stored in the cloud. The bytes transit through the encrypted tunnel between your Mac and the LMCP backend, but they’re never persisted server-side. Turn it off any time and ChatGPT instantly loses access.
If you prefer zero cloud transit, you can use the local lmcp connector inside Claude Desktop, Cursor, or VS Code instead — tool calls go through stdio and never touch the network. Read the privacy guide for the full breakdown.
What You Will Need
- macOS 12 (Monterey) or later — Apple Silicon or Intel
- ChatGPT Plus, Pro, Business, Enterprise, or Edu — custom MCP connectors (Developer mode) are not available on the free plan
- A browser on chatgpt.com — creating the connector is web-only (the desktop/mobile apps can use it afterward)
Visual walkthrough
The four screens you’ll go through, in order:
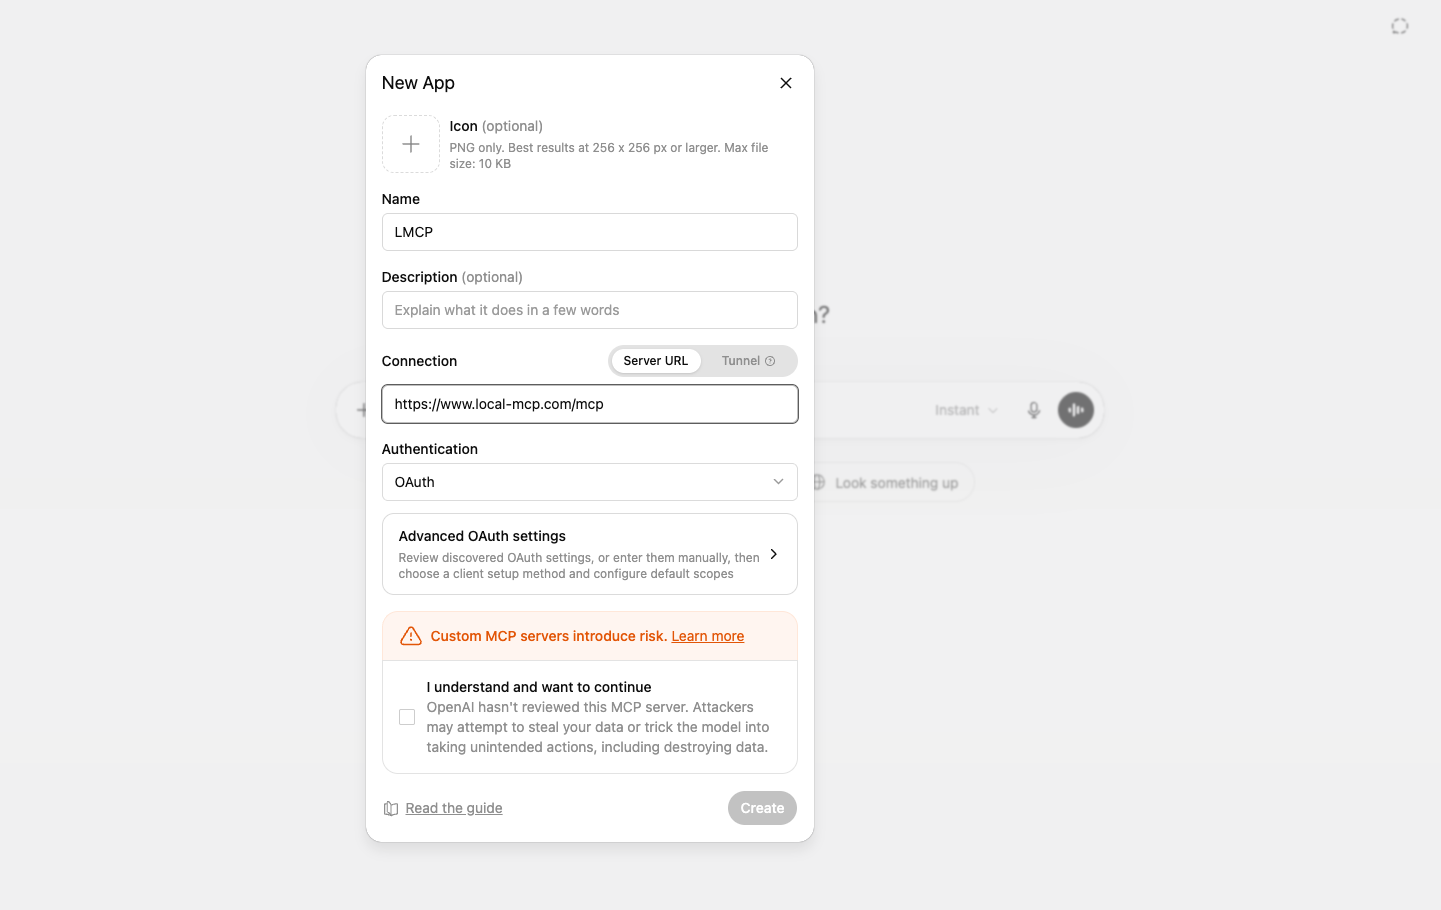
https://www.local-mcp.com/mcp, Authentication OAuth, check “I understand”, then Create.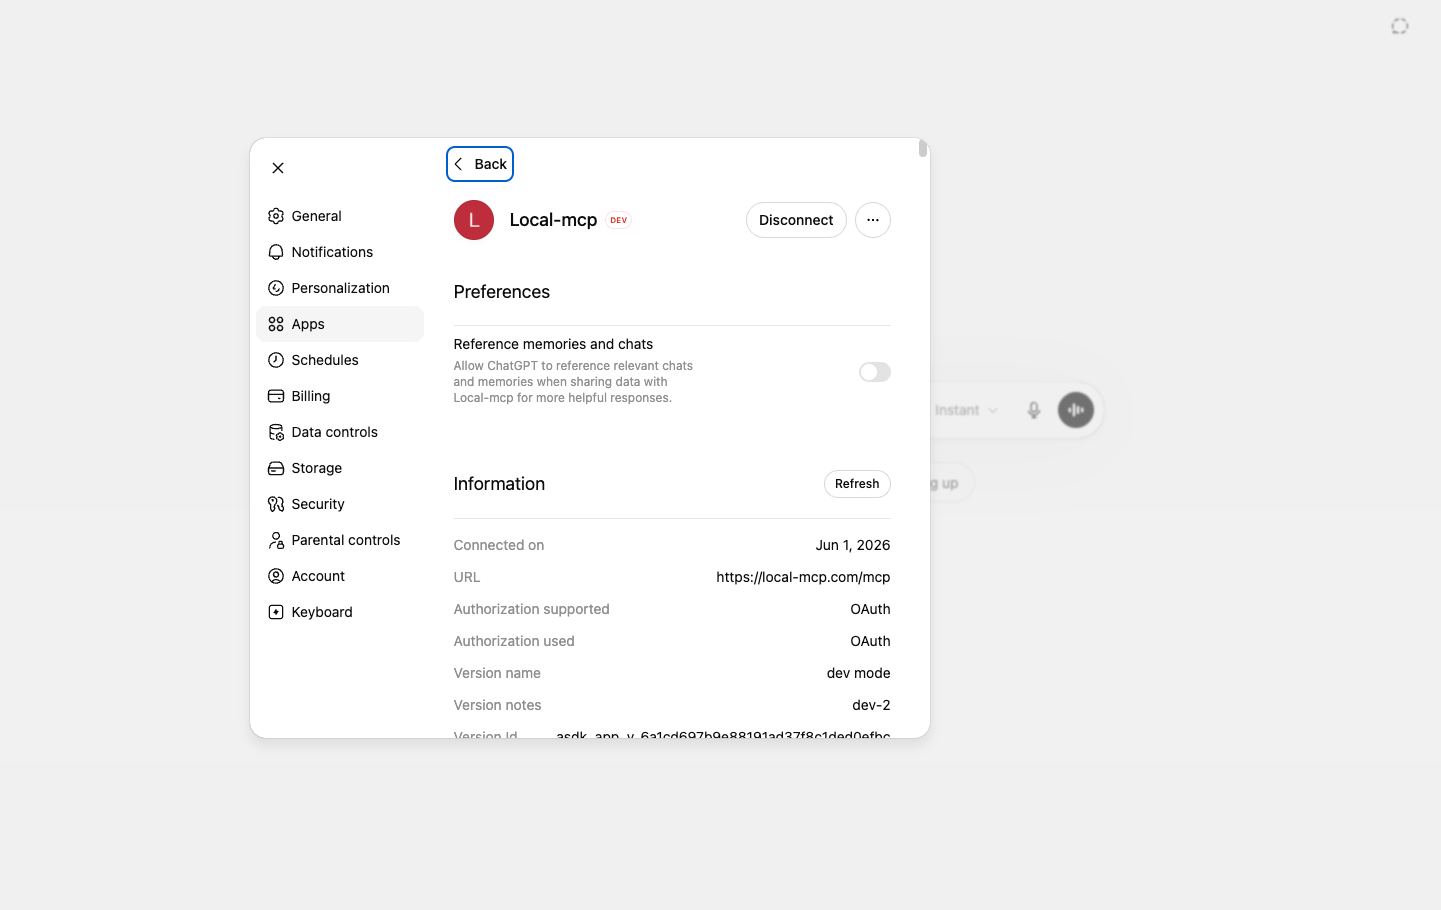
Step 1: Install LMCP on Your Mac
- Download the LMCP installer (.dmg, macOS 12+).
- Open the .dmg, drag Local MCP to Applications, and open it from Applications.
- macOS may ask you to confirm opening an app from the internet — click Open.
LMCP starts automatically and puts an icon in your menu bar. Setup takes about 30 seconds.
Step 2: Turn On Cloud Relay
Click the LMCP icon in your menu bar (top-right of the screen) and find the Web AIs · Via Cloud Relay section:
- Cloud Relay shows Connected (green) once LMCP is running — no email or login needed; the connection is authenticated by a token.
- Toggle Cloud Data Forwarding to ON (off by default for privacy).
- Click Copy next to Connector token — you’ll paste it on the ChatGPT authorize page later.
The token identifies your tunnel — without it, no one can route requests to your Mac. ChatGPT signs in with it through a standard OAuth step (next), so you paste the token once.
Step 3: Turn On Developer Mode in ChatGPT (one-time)
Adding a custom MCP server is gated behind Developer mode. You only do this once. Do it from the web at chatgpt.com — the desktop and mobile apps can use a connector once it exists, but they can’t create one.
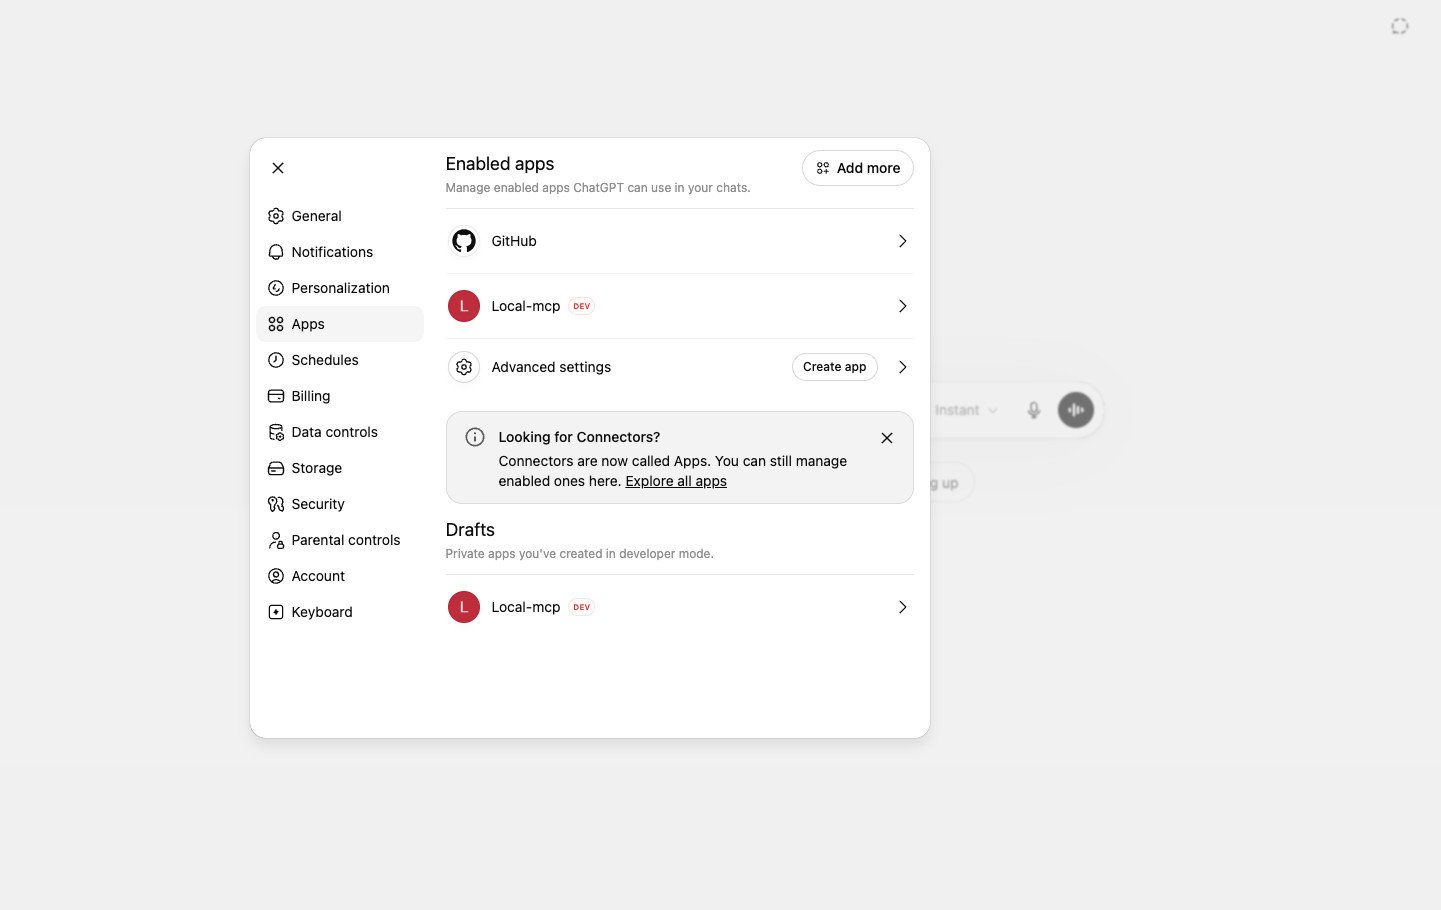
- Open chatgpt.com and click your profile picture → Settings.
- Go to Apps & Connectors.
- Scroll to the bottom and open Advanced settings.
- Toggle Developer mode ON.
Developer mode is available on Plus, Pro, Business, Enterprise, and Edu plans. On Business/Enterprise/Edu, a workspace admin may need to enable it first (Workspace Settings → Connectors).
Step 4: Create the LMCP Connector
Still in Settings → Apps & Connectors:
- Click Create (it appears next to Advanced settings once Developer mode is on).
- Fill in:
- Name:
LMCP(this is the user-facing title) - Description:
My Mac apps — Mail, Calendar, Teams, OneDrive(ChatGPT uses this to decide when to call the tools) - MCP Server URL (or Connector URL):
https://www.local-mcp.com/mcp
- Name:
- For Authentication, choose OAuth — ChatGPT auto-discovers our endpoints (Dynamic Client Registration), so you leave the client ID/secret fields empty.
- Check “I trust this application” and click Create.
Step 4b: Approve with your token
ChatGPT opens an Authorize ChatGPT page on www.local-mcp.com. Approve it with your secure token — only you have it, on your Mac:
- Open the LMCP menu bar app → Settings → Connect and make sureCloud Data Forwarding is ON.
- Click Copy next to Token.
- Switch back to the Authorize page, paste the token, and click Authorize.
The token is what identifies your specific Mac — it’s the secure, unambiguous way to grant access (no email, so it can’t collide with another machine or be triggered by someone who only knows your email).
The page closes automatically and ChatGPT shows the connector as Connected. It then discovers the available tools — with forwarding ON you’ll see setup_install plus the full catalog (typically 150+ tools: Mail, Calendar, Teams, OneDrive, Notes, Reminders, Office files, and more). You only approve once.
Step 5: Try It
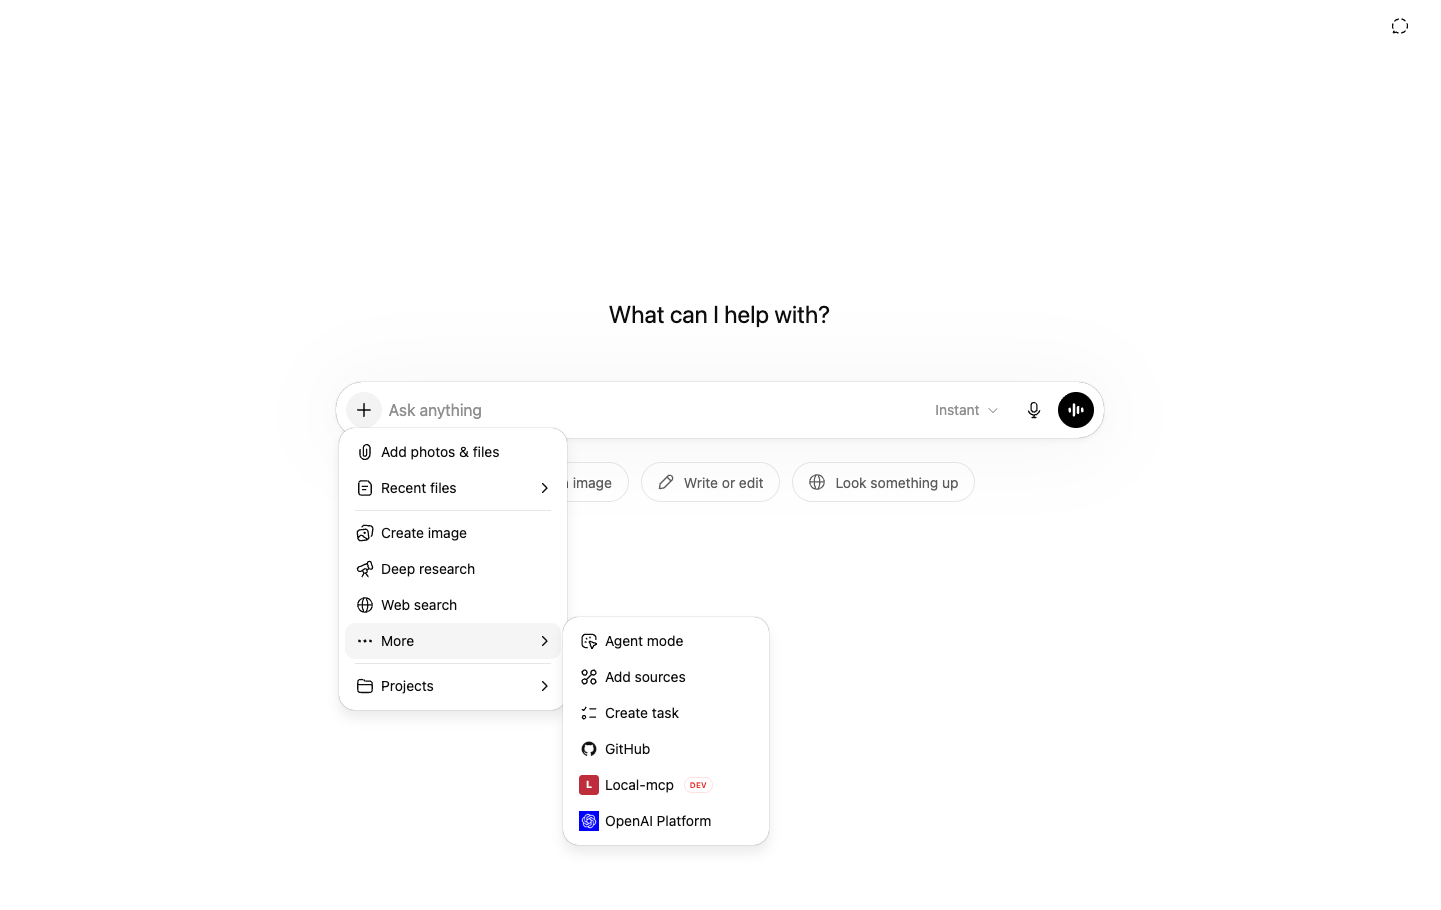
Start a new conversation in ChatGPT. Make sure the LMCP connector is enabled in the chat (the connector toggle in the input bar). Then ask:
- “List my email accounts”
- “What meetings do I have today?”
- “Search my emails for ‘invoice’ this month”
- “Show me the latest messages in the engineering Teams channel”
ChatGPT will route the request through the Cloud Relay to your Mac, which executes the tool and returns the result. You’ll see a tool call indicator in ChatGPT’s UI, and the response usually arrives in under 2 seconds.
What Tools Are Available?
With Cloud Data Forwarding on, ChatGPT sees the same 150+ tools as the local lmcp connector:
- Mail (Mail.app + Outlook): list, read, search, send, reply, move, save attachments
- Calendar: list events, create, delete, check availability
- Contacts: search, list, get details
- Microsoft Teams: list chats, read messages, channel messages (no Graph API needed)
- OneDrive: list, read, write, move, delete, search files
- Notes & Reminders: list, search, create, complete
- Messages: read iMessage chats
- OmniFocus: list tasks, projects, complete, search
- Word, Excel, PowerPoint, PDF: read and create
- Finder & Safari: search files (Spotlight), list folders, bookmarks
Use Cases
Inbox triage from your phone
You’re away from your Mac but want to triage your inbox. Open ChatGPT on your phone: “Summarize new emails from the last 24 hours, group by sender, flag anything from legal or finance.” ChatGPT calls your Mac, reads Mail.app, returns a categorized summary in seconds.
Meeting prep before walking into the room
You have a 3pm meeting and 5 minutes to prepare. From ChatGPT: “Prep me for the 3pm with Maria and Juan. Find recent emails, Teams chats, and shared docs from the last week.” ChatGPT cross-references your calendar attendees with email/Teams/OneDrive activity and gives you a context brief.
Weekly status report
Friday afternoon: “Write my weekly status report based on this week’s emails, calendar events, and Teams discussions.” ChatGPT pulls the data, generates the report, you copy-paste to Slack or send by email.
Turning It Off
Open the LMCP menu bar popover → Web AIs section, toggle Cloud Data Forwarding back to OFF. The change is instant: ChatGPT immediately loses access to data tools. Your tunnel stays connected for setup_install, but no data flows through.
Troubleshooting
ChatGPT says “Could not reach your Mac”
The LMCP app isn’t running, or the Cloud Relay tunnel is down. Open the LMCP menu bar — the dot should be green and Cloud Relay should read Connected. If LMCP isn’t running at all, download and reinstall the .dmg.
Settings shows “No app actions available yet” after connecting
This is expected — it does not mean the connector is broken. ChatGPT’s developer-mode app settings panel does not enumerate MCP tools there. Once it says Connected (and the button reads Disconnect), the tools work in chat: start a new chat, click + → More → Local-mcp to enable it, then ask e.g. “using Local-mcp, list my calendars.” The tool call runs and returns data from your Mac.
LMCP’s tools don’t appear right after connecting
A known ChatGPT Developer-Mode quirk: it caches the connector’s tool list and doesn’t always reload it the moment OAuth completes. Open Settings → Connectors → LMCP → Információn and click Actualizar (Refresh) — or just start a new chat. The full tool set then loads. (LMCP advertises 150+ tools; ChatGPT also surfaces only the few relevant to your current question and loads the rest on demand, so don’t worry if “list all tools” shows just a handful.)
Tools list shows only setup_install (no Mail, Calendar, etc.)
Cloud Data Forwarding is OFF — the cloud connector intentionally lists only setup_install until you opt in. Open the LMCP menu bar popover → Web AIs section, toggle Cloud Data Forwarding ON, then refresh ChatGPT.
ChatGPT says “the connector is not authenticated”
The token is wrong or expired. Open the LMCP menu bar popover → Web AIs section, click Copy next to Connector token, and paste it again on ChatGPT’s Authorize page.
Cloud Relay isn’t connected
The Cloud Relay connects automatically when LMCP runs (green dot, reads Connected). For data tools you also need Cloud Data Forwarding ON. Check both in the Web AIs section.
There’s no “Create” button in ChatGPT’s Apps & Connectors
Developer mode isn’t on. Go to Settings → Apps & Connectors → Advanced settings and toggle Developer mode ON (Step 3). On a Business/Enterprise/Edu workspace, an admin may need to allow custom connectors first. Also make sure you’re on chatgpt.com in a browser — the desktop and mobile apps can’t create connectors.
The token isn’t being accepted
Make sure you copied the whole token (it starts with lmcp-) using the Copy button in Settings → Connect — don’t retype it. The Token field only appears when the Cloud Relay is connected (green dot) andCloud Data Forwarding is ON. If ChatGPT later says the connector is “not authenticated”, copy the token again and re-paste it in the connector settings.
What About Other AI Clients?
The Cloud Relay works with any MCP-compatible client that supports custom servers and Bearer authentication:
- Claude.ai web: same flow, add as Custom Connector in Settings — see the Claude.ai guide
- Custom MCP clients: any tool that can hit a JSON-RPC endpoint over HTTPS with Bearer auth
For Claude Desktop, Cursor, VS Code, Windsurf, or Zed running on your Mac, you don’t need the Cloud Relay at all — LMCP autoconfigures the local lmcp connector during install, and tool calls go through stdio without touching the cloud. See the Claude Desktop guide for that flow.
Related Guides
- Connect ChatGPT to Your Mac Apps (overview)
- Connect ChatGPT to Your Email on Mac
- Connect ChatGPT to Your Calendar on Mac
- How to Connect Claude.ai Web to Your Mac (Cloud Relay)
- How to Give Your AI Access to Email on Mac
- Read Microsoft Teams Messages with AI — No Tokens, No Graph API
- Can AI Read Your Emails Without Sending Them to the Cloud?